THIS IS THE INDEX PAGE. THIS PAGE IS ONLY USE FOR WEEBLY SYSTEM. NO NOT USE THIS PAGE!!!!
PLEASE CHOOSE A DIFFERENT PAGE LAYOUT TO CREATE YOUR WEBSITE

The Drink of the Gods!:
Learn how to make Thor's favorite libation!
Hail Friends! Today's post is about making epic juice aka mead. Mead is an ancient beverage that requires very few ingredients: water, honey and yeast. There are tons of variations out there but the common element is always a base of honey to fuel the yeast during fermentation. My last batch was a strict mead and came out very dry (not for the faint of heart). This time around I'm making a hybrid hard cider/mead - a cyser. I've done this before for a special event and it came out amazing.
Before I go any further, I want to give credit where credit is due for getting me started on my mead making adventures in the first place.....
Before I go any further, I want to give credit where credit is due for getting me started on my mead making adventures in the first place.....
Years ago, it was by chance that I came upon a youtube video posted by these guys, Amon Amarth. It was a simple tutorial on how to make mead in a single gallon jug of spring water on the cheap. These guys are from Sweden and fully embrace their viking heritage, so I thought, "Why not? My metal brethren wouldn't lead me astray on such a sacred topic!" Ever since then I've been fermenting on a regular basis. Hopefully, I will be seeing them later this month on tour and will be able to thank them properly.
Back to the tutorial! The first picture above is everything that I used to make my latest batch - it was pitched (started) on Sunday, January 12th 2014. Here is the inventory:
- 3 gallons of apple juice (I use Mott's b/c they don't have any preservatives that could kill the yeast).
- 21 pounds of honey (3lbs x 2 from Minnesota, the rest from Costco. I usually use 3lbs per 1 gallon of end product as a minimum requirement).
- 1 pound of dried cranberries for added sugar and flavor
- 1 packet of yest from the supermarket (8.75 grams I believe)
- "Easy Clean" food grade sanitizer
- 1 bottle of Ethyl Alcohol (not pictures)
- 5-6 gallon bucket with a spigot
- 1 airlock
.....and that's it!

When I first started making mead, I just had one of these 5gal water jugs to keep things cheap and simple. I was able to purchase them from my local supermarket. Ultimately, I moved onto the bucket above to make things easier - siphoning the mead out can be a mess and a pain in the ass compared to just turning a knob. An added bonus of starting with these jugs is that there is a refund/return value on them. All I had to do was take them back to the store and I had a nice little "rebate" for my bucket.
Step 1: Sanitize!
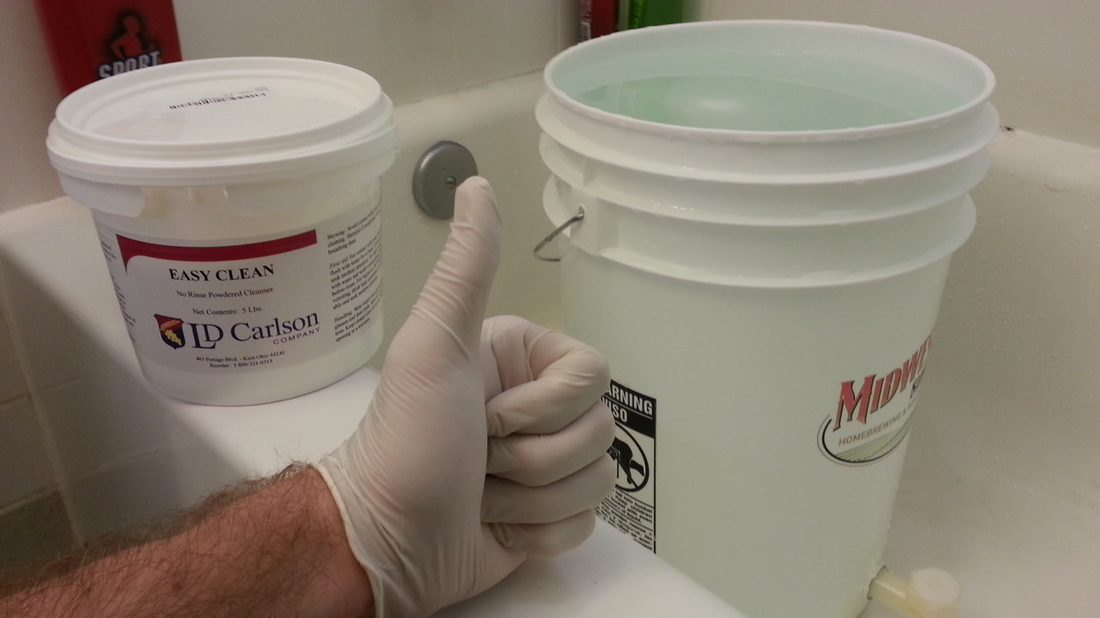
Just like when making any sort of food item, you want to make sure that everything is 100% clean. The last thing you want is for your investment to literally go down the drain - you only have one shot! Wild yeast is everywhere and can ruin a batch very easily. I use Easy Clean (purchased on Amazon) to sanitize my bucket - 1 tbls per gallon. They say to let it sit for about 2 min so I just fill it up and open the spigot to slowly drain it out. They say its a "no rinse" product, but I do this twice just to be safe.
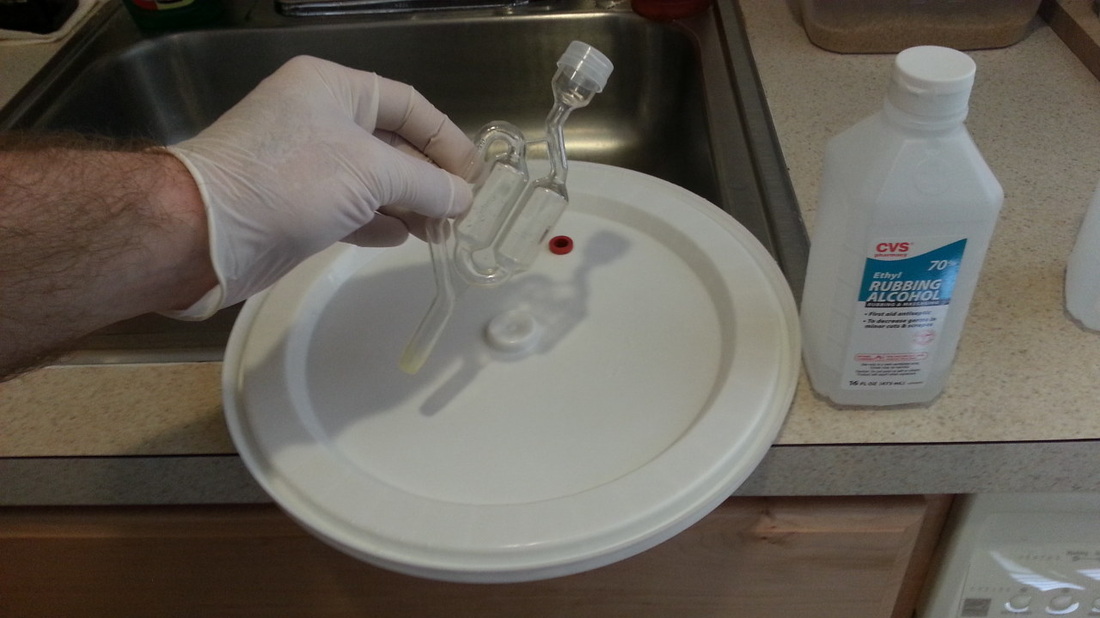
To clean the airlock and the lid I use the Ethyl Alcohol. This is the type of alcohol that is produced by the yeast and therefore not dangerous to use. DO NOT USE ISOPROPYL ALCOHOL - IT IS POISON!!! I just squirt the Ethyl onto the lid and let it sit for a few minutes, wetting a paper towel with it to get into areas where the liquid won't gather. It will evaporate on its own but I still give it a rinse in the sink when I'm done.
Step 2: Misc Prep.
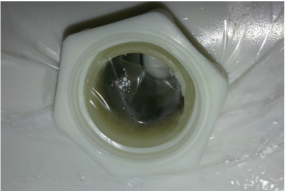
Note: Before I started sanitizing, I re-modded the intake of the spigot on my bucket with a new sheet of plastic. At the end of the fermentation process there will always be a bit of sediment left on the bottom of whatever container you are using. You don't want to drink this. As added insurance, I cut out a piece of plastic sandwich bag to create a dam, raising the level required for liquid to flow over/through. My bucket came with a plastic nut used to secure the spigot from the inside, so all I had to do was hold the plastic sheet in place as I tightened the nut.
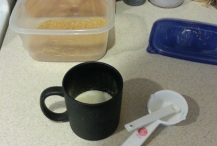
Yeast is a living organism and can die just like anything else. To help the yeast packets keep longer, it is advised to keep them in your fridge (cryostasis!). I purchased this packet to make my last batch so I wanted to make sure (and it's a good idea to do this in general) that it was still viable. You do this by mixing the packet with 1/4 cup warm water and 1/4 tsp sugar. Mix it up real good, making sure that all of the yeast gets wet/exposed. After that, wait five minutes and hopefully you will see......
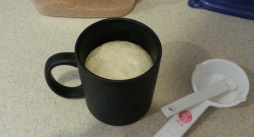
This! As the yeast ferments it will rise up a considerable amount, showing you that it is still alive. After ten minutes, it was almost spilling over the top. You will also see/hear bubbles - this is C02 being released as a by product of the fermentation process.
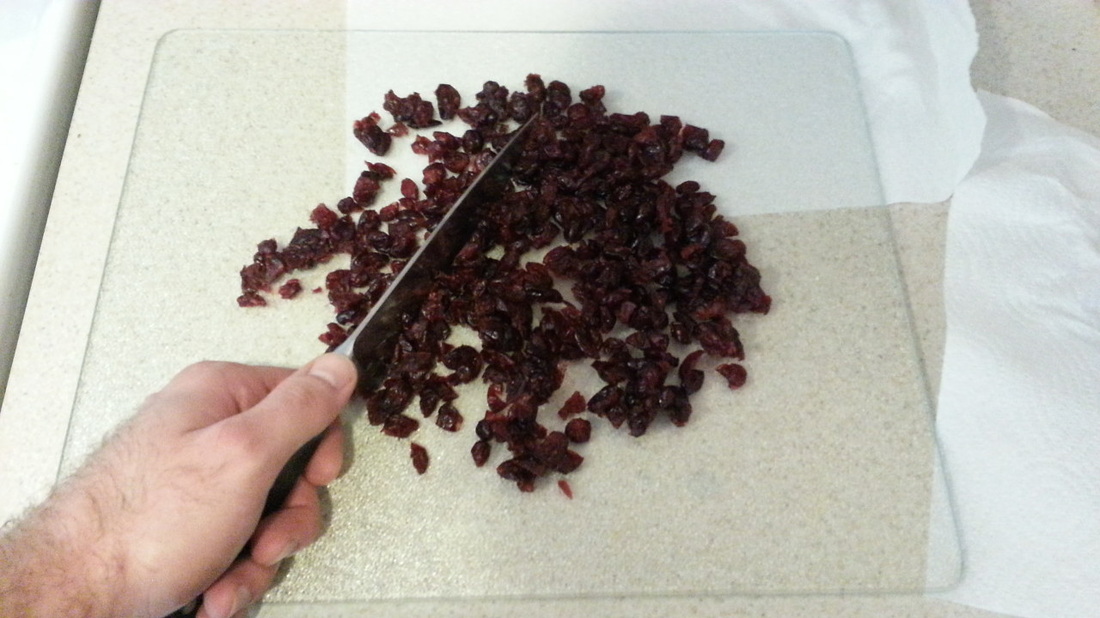
After weighing out about a pound of dried cranberries, I chopped them up to increase the amount of surface area being exposed. You don't have to go crazy here. If you don't get a few its not a deal-breaker. The cranberries will add color, flavor and extra fuel - you will be hard-pressed to find any that do not have sugar added to them.
Step 3: Let the Alchemy Begin!
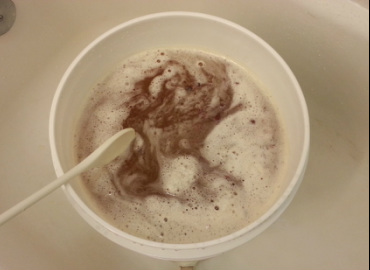
Time to pour everything into the bucket! The order was: apple juice, yeast, honey, cranberries. I start with the apple juice in order to give the yeast and honey something to dissipate into. When pouring the ingredients into the bucket I tend to pour from a little bit of height, causing aeration to occur. Just like anything else alive, yeast needs oxygen to thrive and the more the better in the beginning. Once everything is poured in, I take a long spoon and stir vigorously for five minutes clockwise and then five minutes counter clockwise. I do this to make sure that everything on the bottom has dissolved/been mixed up as much as possible. When I used the big water jugs, I just capped it and shook the hell out of it.
During the pouring process of the honey, there will always be a good amount that sticks to the insides of the container. Simple solution: add some warm/hot water and shake with evil intent.
Usually, this will bring your liquid level close to the top of your container - you only want 1"-2" of air space at the most. The less space, the better (more of a closed system). Do not fill it all the way to the brim - as the C02 builds, overflows/leaks are possible.
A note on the water: I have a Pur filter on my faucet that does a good job of filtering out any additives (chlorine etc.) that may be present. If you live in the city you can probably smell/taste the chlorine in your water - there is a decent chance that this will kill some of the yeast and/or delay your fermentation greatly (why Amon Amarth suggested bottled spring water). On top of that, I'm sure it would alter the taste of your mead in the long run.
Note: Some people boil their honey (commercial facilities) beforehand to kill anything living in it. I have never done this and rely on the fact that honey is naturally anti-bacterial and can not go bad. That being said, the less mystery elements the easier it is to recreate a certain batch in the future. Proceed at your own risk.
Step 3.5: Optional Measures...literally.

If you really get invested in your mead making, purchasing a hydrometer is a great idea. Once again, you can get one off of Amazon or if you have a LHBS (Local Home Brew Shop) you can get one there as well. A hydrometer measures the density of the liquid it is floating in, with the reading giving you the SG (specific gravity). A reading of "1" means that your liquid is equivalent to water in density. For our purposes, the higher the reading the higher the potential for alcohol (also the higher the sugar content). My reading was off the chart at about 1.170. This reading can vary depending on temperature but at room temperature I'm not going to be that picky. On the other side of my hydrometer is a scale for potential alcohol - a SG of 1.170 could result in a product in the 30% alcohol range (60 proof).
Different strains of yeast can survive at different levels of alcohol and being that I didn't seek out a super yeast strain, I expect to wind up with around 15%+ alcohol content in the end (like most of my brews). The sugar that doesn't get used up in the end just makes your mead sweet (what I expect this batch to be). The hydrometer is also used to monitor your fermentation. As the sugar is used up the SG reading will drop and when it stops dropping, the yeast is done fermenting. Readings will differ, but when it nears "1" it is done most of the time.
Different strains of yeast can survive at different levels of alcohol and being that I didn't seek out a super yeast strain, I expect to wind up with around 15%+ alcohol content in the end (like most of my brews). The sugar that doesn't get used up in the end just makes your mead sweet (what I expect this batch to be). The hydrometer is also used to monitor your fermentation. As the sugar is used up the SG reading will drop and when it stops dropping, the yeast is done fermenting. Readings will differ, but when it nears "1" it is done most of the time.
Step 4: The Waiting Game.

Once everything is mixed up, you snap the airtight lid on, insert the airlock to monitor your bubbles (evidence of fermentation) and wait. The manual labor is done for the most part and after this first one to two weeks, I'm in "set it and forget it" mode. As mentioned earlier, during the initial stages of fermentation oxygen is very important. Some people do not aerate past the initial mixing phase unless they think that fermentation has stalled. I like to give things a good stir every other day during the first week to ensure maximum productivity. Being sanitary is always a concern, so I sterilize my stirring spoon with Ethyl Alcohol beforehand (I rinse the spoon off before I stir).
The "initial fermentation" will usually be completed in one to two weeks. During this period the airlock will be bubbling regularly as the byproduct C02 escapes. Bubble rates will vary, but one bubble passing through every three to ten seconds is normal. When it takes 60 or more second for a bubble to go through, things are starting to come to a close.
Overall, things should be left alone for about 30 days. After that, technically your mead is done and drinkable. I've found that six months is an optimal age for the flavors in the mead to really start maturing properly, though. Of course you will find many people saying that multiple years are required before a mead really hits its stride....I'm not gonna wait that long.
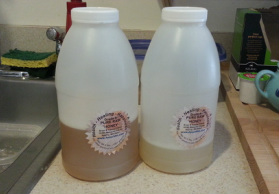
A good deal of people transfer their mead into smaller 1 gallon containers after the initial 30 days. The transfer from one container to another is called "racking". This is to separate the liquid from the dead/dormant yeast (to avoid potential unwanted flavors) and to begin secondary fermentation. This stage is really just a continuation of the initial fermentation as yeast will still be present in the liquid until it all settles out and the mead clears. If you are not concerned with the flavor issue, this step can make it easier for the mead to clear/settle in the end.
That being said, I have never transferred my mead over for secondary fermentation right away after the initial 30 days. This is not an uncommon practice by any means but might be looked down upon by purists. This is a hobby to me and the less work the better. I usually wait a few months before transferring my mead to 1 gallon carboys/do it at my leisure. I figure that this might be more authentic to the original mead brewing practices anyway.
The "initial fermentation" will usually be completed in one to two weeks. During this period the airlock will be bubbling regularly as the byproduct C02 escapes. Bubble rates will vary, but one bubble passing through every three to ten seconds is normal. When it takes 60 or more second for a bubble to go through, things are starting to come to a close.
Overall, things should be left alone for about 30 days. After that, technically your mead is done and drinkable. I've found that six months is an optimal age for the flavors in the mead to really start maturing properly, though. Of course you will find many people saying that multiple years are required before a mead really hits its stride....I'm not gonna wait that long.
A good deal of people transfer their mead into smaller 1 gallon containers after the initial 30 days. The transfer from one container to another is called "racking". This is to separate the liquid from the dead/dormant yeast (to avoid potential unwanted flavors) and to begin secondary fermentation. This stage is really just a continuation of the initial fermentation as yeast will still be present in the liquid until it all settles out and the mead clears. If you are not concerned with the flavor issue, this step can make it easier for the mead to clear/settle in the end.
That being said, I have never transferred my mead over for secondary fermentation right away after the initial 30 days. This is not an uncommon practice by any means but might be looked down upon by purists. This is a hobby to me and the less work the better. I usually wait a few months before transferring my mead to 1 gallon carboys/do it at my leisure. I figure that this might be more authentic to the original mead brewing practices anyway.
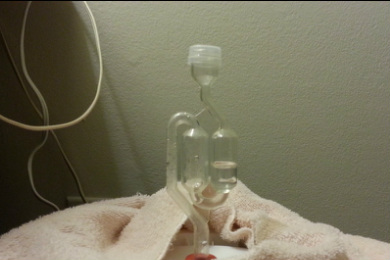
One final note: During the initial fermentation period, temperature regulation is important. Too hot and the yeast freaks out creating "higher alcohols" (tastes/smells like rubbing alcohol). Too cold and the yeast goes dormant. The ideal range for most yeast is 65-70 degrees Fahrenheit.
In the picture you can see that the yeast are happily fermenting (water being pushed in the airlock) and that I have a thick towel wrapped around the bucket. Since it is winter, I do this as a precautionary measure in case the house dips towards the lower 60's during the day when I'm at work and we have the thermostat on "idle". During the summer it is best to keep things in the basement if possible or in a room with ample AC. I had a batch ruined on me (higher alcohols) when the temps spiked from the low 70's to 90's during the day (AC was not on) a few years ago.
In the picture you can see that the yeast are happily fermenting (water being pushed in the airlock) and that I have a thick towel wrapped around the bucket. Since it is winter, I do this as a precautionary measure in case the house dips towards the lower 60's during the day when I'm at work and we have the thermostat on "idle". During the summer it is best to keep things in the basement if possible or in a room with ample AC. I had a batch ruined on me (higher alcohols) when the temps spiked from the low 70's to 90's during the day (AC was not on) a few years ago.
Step 5: Quench Thy Thirst!
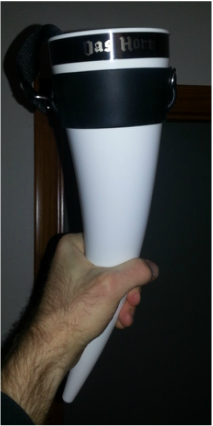
In order to properly enjoy your handiwork a proper drinking vessel is required! Horns and steins are preferred, but wine glasses are acceptable as well, ha! As far as serving temperature goes, for dryer mead (higher alcohol content) I find that room temperature is best as it lets the full flavors come out. For sweet mead, being either cooled in the fridge or poured over ice are preferred methods of consumptions.
And there you have it! I hope you enjoyed this tutorial on such an epic beverage. If you have any questions or input, please comment below!
Legal: Always abide by your local and federal alcohol regulations. For entertainment purposes only. Only intended for those of 21+ years old.
And there you have it! I hope you enjoyed this tutorial on such an epic beverage. If you have any questions or input, please comment below!
Legal: Always abide by your local and federal alcohol regulations. For entertainment purposes only. Only intended for those of 21+ years old.